We're sorry but your browser doesn't support some of the newer web features we take advantage of. In order to use this site please consider installing the latest version of one of the following browsers:

DIY Toy Story Jessie Ears
September 25, 2024
0 Comments

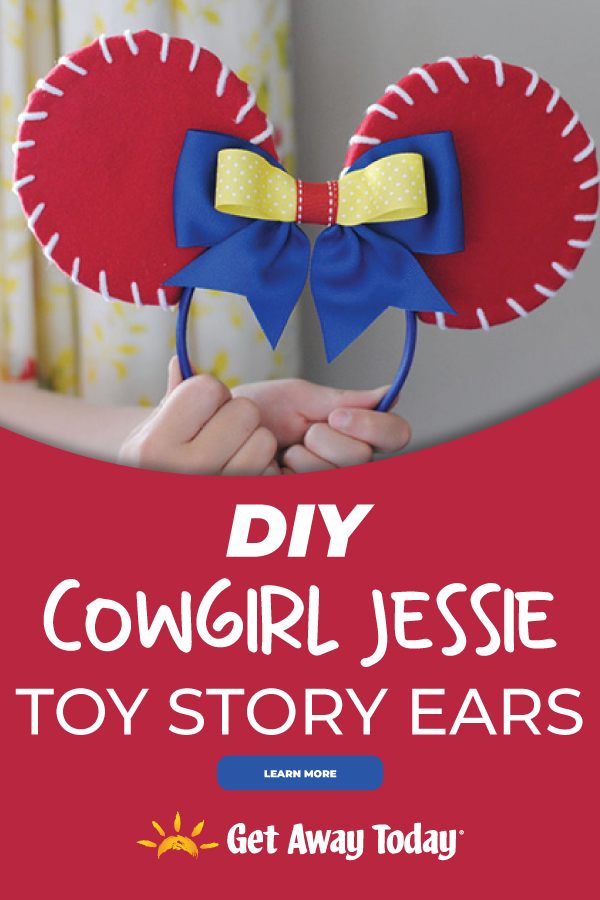
Make your own Toy Story Jessie Ears for your trip to the Disney Parks. This easy Pixar-inspired tutorial will get you ready to visit Pixar Pier at Disney California Adventure Park in California or Toy Story Land at Disney’s Hollywood Studios in Florida.

Get into the spirit of Pixar Pier and Toy Story Land with these easy to make Jessie the Cowgirl inspired Minnie Ears. Y'all are going to want to give me a big whopping "Yeehaw!" because we have discovered the best way to make your own Minnie and Mickey ears. Rustle up your supplies and get mooooovin' on this cute craft project. Your Toy Story Jessie Ears are going to be a serious hit for your little buckaroos.

Toy Story Ears Tutorial

Have you ever made a pair of ears with pool noodles? Now’s the time to do it! It is such an easy trick, they are already perfectly round and a great size! For adults, we suggest using the larger pool noodles that are about 5 inches wide, but a standard pool noodle that is smaller would be perfect for a toddler pair of ears.

DIY Toy Story Jessie Ears - Cutting the Ears

Start by cutting two circles from the end of the pool noodle. Make them about 1/2 inch thick, a steak knife works perfectly for slicing.
You need to cut a little half-moon shape from the bottom of each pool noodle circle. Use your headband as a guide to see what angle to cut out.
Place the circles onto the red flannel fabric. Use a marker to trace the pool noodle circle one time. Move the circle to a new spot of the fabric. Then, use a marker to trace around the circle a second time, but this time, make a 3/4-inch border around the entire edge. You need to do this for each ear. In the end, you will have traced two small ear patterns and two large ear patterns.
Cut out the shapes from the fabric.

We ironed our fabric to get rid of any wrinkles so the ears looked extra clean. Plug in the hot glue gun and get the glue ready.

Place the pool noodle circle onto the larger fabric piece. Ad hot glue little by little along the edge of the foam circle and then wrap the fabric around and press it into the glue.

Keep gluing and pressing until you have traveled around the entire circle.
Then, add a thin layer of hot glue around the top edge of the foam circle and quickly place the smaller fabric piece onto the glue and secure it in place. Repeat the steps for the second ear on your Toy Story Story Jessie Ears.

DIY Toy Story Jessie Ears - Yarn Accents

Now, for the fun part! You get to make the ears look like Jessie's cute cowgirl hat. Do not be nervous about doing this stitch. Thread a yarn needle with white yarn. You will need about a yard of yarn for each ear.
Send the needle through the fabric and pool noodle ear from the back of the ear to the front in the low corner. Pull the yarn all the way through until you have about an inch left over. Tie a knot. Trim the excess string from the knot end.
Sew the yarn in a circular pattern by sticking the needle in the front of the ear and pulling it through to the back. Work all the way around the edge of the ear. Try to keep the stitches evenly spaced and long.
When you get to the end, tie the yarn off in the back and trim the excess. Repeat the steps on the second ear.

Placing the Jessie "Cowboy Hat" Ears

Now, you have two cute Jessie hat ears! Lay them out on a table with your headband. Center the ears. You need to have the ears out further than you might think because the headband spreads open when it is on your head. So, it changes the angle of the ears. We moved ours farther apart after we took this photo!

Glue the ears onto the headband with hot glue. Then, decorate them with a ribbon bow. We used a pre-made blue bow but you could create your own with blue ribbon. Then, add some yellow polka dot and red striped ribbon to match Jessie's outfit.

You can make the bow however you want. We cut a 5-inch section of yellow polka dot ribbon, made it into a loop and secured the ends together with a dot of hot glue.

We placed the yellow ribbon loop on top of the blue bow then wrapped a short piece of red ribbon around the center of the yellow ribbon, blue bow and the headband making sure to pull the ribbon tight. Place a dot of hot glue on the back of the headband and the red ribbon to keep them all in place.

Just like that, your Toy Story Jessie Ears are complete! Just perfect for a day at Pixar Pier or Toy Story Land!

Plan Your Toy Story Vacation Today
Plan your Pixar-inspired vacation to either Disneyland or Disney World online now. Or, give our Disney experts a call at 855-GET-AWAY. We can’t wait to help you plan the best vacation yet – especially since you’ll get to show off these cute ears!

DIY Toy Story Jessie Ears || Get Away Today

Join the Conversation!

Leave A Comment
0 Comments

Leave a Comment